Wednesday, November 30, 2011

Homegrown, Hand-Rolled Cigars

 Tobacco varieties we grew

In response to a question about rolling cigars on this post, my brother Chris steps in to guest post. Take it away...

So after reading everything I could on the internet, and still not fully sure what I was doing, I decided to try my had at rolling a cigar.

First step - Create a form for the cigars to be pressed into to make a somewhat uniformly sized cigar. 

Second step - Find a binder wrapper.  This is the initial leaf that's used to wrap the filler to create your rough cigar.  Even though we had 3 types of leaves, I found it was easiest just to find a leaf that was in good enough shape (no holes or tears, as well as being pliable enough roll).

Pause while H2 inserts a photo of Chris's first drying step--hung them in his garage (hi Elvis). When they started getting dry he moved the leaves to his cellar, where there's more humidity, keeping an eye out for mold, though none appeared. This photo illustrates how tobacco grows in different-sized leaves, some better for use as a wrapper. (It also illustrates how nice it is to have a garage to store stuff in.)

Third step - Filler.  Some sites recommended cutting the filler to create a more uniform cigar.  But I hate to chew a cigar with cut tobacco, so I opted to use the full leaf.  I grabbed enough leaf, hoping  it would fit in the mold.  Wrapped that leaf in the wrapper (the initial roll needs to be pretty tight), glued it with egg white, and pressed it into the form.  Some seemed a little loose, others I needed to really press in.  I guess the correct amount of leaf comes from experience.

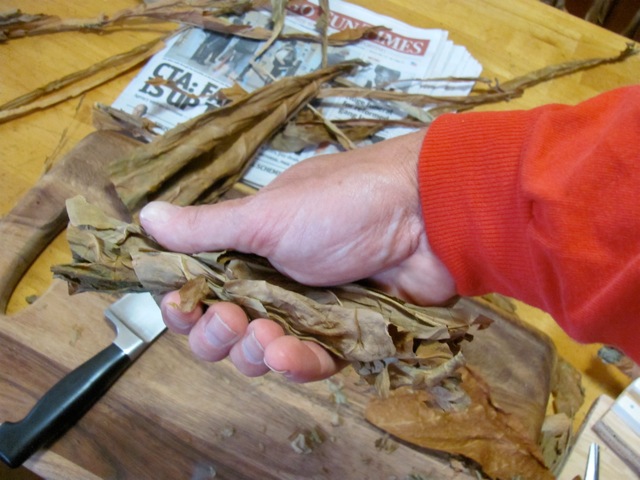
Fourth step - Pressure.  After filling the form with 10 cigars, place a piece of wood on top and press.  The cigars are left in the form for a few days to dry. Some sites say to put the forms in the oven on low for an hour to dry, but I just let them dry naturally.

Last step - Final wrap.  For the final roll, I sprayed the leaves (probably should spray the leaves for the initial roll, too) with a sprayer and let them soak up the water. This made them much easier to work with. I had enough good leaves to make a smooth final wrap. 

Postprandial Thanksgiving cigars 

Tuesday, November 29, 2011

Growing Tobacco Using Sub Irrigation

Quick update on growing tobacco in SIPs (sub irrigated planters), a project started by a friend this spring and carried forth by a village of curious folk.

Cut to the chase: tobacco loves sub irrigation.

Part of the harvest, drying upstairs, from our roof and Bruce's.


And on Thanksgiving, cigars to share, hand-rolled by my brother, who grew the same varieties in his in-ground organic garden...


Thursday, November 24, 2011

Harvest for the World

Half of us are satisfied, half of us in need
(or possibly 99%)


So dress me up for battle
When all I want is peace
Those of us who pay the price
come home with the least
And nation after nation
Are turning into beasts
When will there be a harvest for the world?

Sunday, November 20, 2011

Most Store Honey Isn't Honey

Real bees taking a break
from making real honey
on a hot hot Chicago summer night

Read this not-so-sweet report on adulterated honey:
"There is only one reason to ultra-filter honey and there's nothing good about it..."

Thursday, November 17, 2011

Colossal Egg, Fairy Egg

Outdoor life clearly suits Bruce's hens. They strut and scratch happily all over his yard, turning up the soil in his herb garden. Recently, a couple of oddities.

 Last week:
the 91-gram egg
 Complete with double yolk
Look at that giant!

Today, the 11.9-gram fairy egg
 Tiny testament
to our 27-degree F low last night?

Let's crack the little guy open and see what we've got...

 Mostly white,
with the faintest promise of a yolk

Tuesday, November 15, 2011

Jerry's SIP Report from Central Texas

Hello again after too long. We've been drying our potting mix--more on those autumnal duties soon. But today, meet GRG reader Jerry from Central Texas...
We love when readers write to tell us how SIPs work where they live, and this report beautifully illustrates the water-sparing action of sub irrigation.
I became interested in SIPs because the idea of using less water appealed to me.  With traditional container gardening it would be necessary to water a couple of times a day in a climate such as the one I live in.  This year we have had 80 days of over 100 degrees and because of that very frequent watering would be necessary with other types of vegetable gardens.  
Pity the peppers up front...weak, yellowing, and probably thirsty.
The ones in the foreground, in the raised beds, were planted the same day in early Sept. as the ones in the SIPs behind them.  The 2 plants in the SIPs were about 3 times as large and had more peppers per plant.  Also, I watered the plants in the raised bed at least twice as frequently.  Here in central Texas we have had only one measurable rain since I planted the peppers.
Another aspect that I like about SIPs is that weeding is not necessary.  Even though I mulch my raised beds I sometimes have very severe weeding problems.  With the SIPs I only had to pull one blade of grass.
This...

...or this?
After this initial try with the SIPs I can see that they are the way to go in a climate such as we have here.
Jerry notes he's raising worms and wonders if he can use the vermicompost in SIPs. The answer is yes, if in limited fashion. Both Bruce and I have added a couple cups of worm castings to our SIPs with good results, so go for it. And thanks, Jerry, for checking in.